Configuring SickBeard to work with SABnzbd+

Configuring the SABnzbd+ side of things
So now that you have installed SickBeard you’ll need to set it up and get it talking to SABnzbd+. Haven’t installed SickBeard yet? Read this first. Before going any further with SickBeard we need to get things setup properly on the SABnzbd+ side of things. Open up SABnzbd+ in a new tab (it’s probably at http://localhost:8081) and click Config and then Folders.

Find Post-Processing Scripts Folder. We need to tell SABnzbd+ where to find SickBeard’s scripts. There is a folder inside the Sick-Beard folder called autoProcessTV. If you just installed it to your home folder the path will probably be the same as in the picture below. Set the folder and then make sure to his Save Changes.

In the left column, click Categories. Make sure you have a category called sickbeard. If you don’t have it, you’ll need to create one with that name. You can use any folder you want. This will just be a temporary location for SickBeard downloads to be stored in before SickBeard sorts them. You’ll also need to change the Script from Default to sabToSickBeard.py. If you don’t see that script you need to double check that you completed the previous step properly. It should look something like this:

The last thing we need to do in SABnzbd+ is get the API key. We can find it on the Config –> General page. You probably want to copy this to your clipboard so you can just paste it into SickBeard.

Now for the SickBeard side of things
We’ll be going though each page one by one. Click Config –> Search Settings.

Before going any further, we need to change one setting on this page. Change NZB Method from Black Hole to SABnzbd. Hit the Save Changes button. You’ll see some more options.
First enter the SABnzbd URL. It’s probably http://localhost:8080. You only need to enter a username and password if you have one setup in SABnzbd+. Paste in the SABnzbd API key that you should still have in your clipboard and set the Category to sickbeard Then hit Test SABnzbd. If you get a Success message go ahead and hit Save Changes. Otherwise, check your settings and try again.
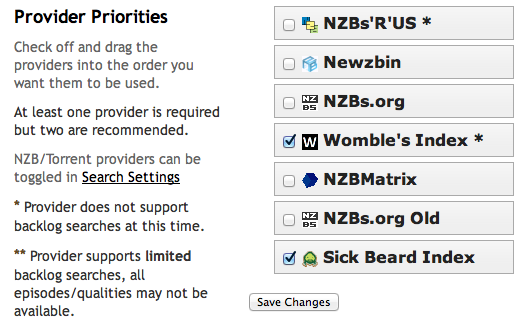
Now let’s move on to the Search Providers page. Womble’s Index should be checked already, and go ahead and check Sick Beard Index. The more providers you have setup here, the better, but for all the others you will need to sign up for accounts first. Then enter your account information on this page. Make sure you click Save Changes when you are done.
Next, let’s take a look at the Post-Processing Page. Since we are using SABnzbd+ post processing we don’t need to set a Download directory and we don’t need to check Scan and Process. I also recommend unchecking Keep Original and Move Associated Files.

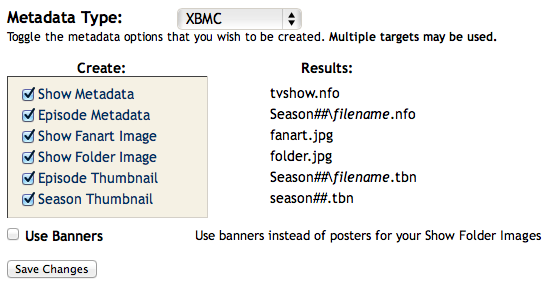
If you don’t use an app like XBMC then this section isn’t really useful to you. Pick the app you are using from the drop down. I check everything so that SickBeard downloads all this for me making things easier for XBMC.
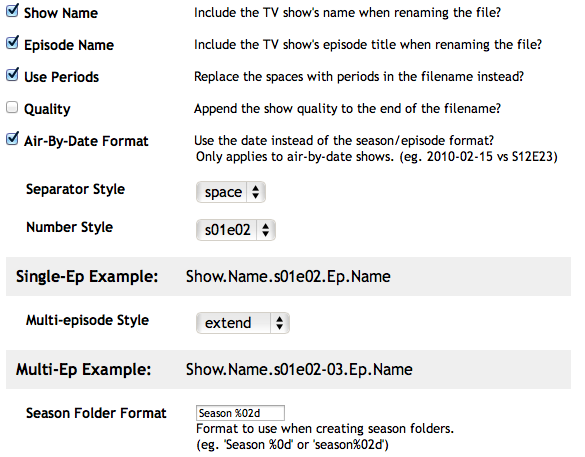
The last section determines the name and organization scheme. Read through the options and set this to suit your preferences (or just leave as is).
One final step. Using Finder, navigate to your Sick-Beard folder. Inside that, open the autoProcessTV folder. Rename autoProcessTV.cfg.sample to autoProcessTV.cfg and then open the file with your favorite text editor. You probably won’t have to change anything. If you aren’t using the default port or you’ve set up a username and password make sure to set that here. Otherwise, you are good to go as is.
# autoProcessTV.cfg.sample

[SickBeard]
host=localhost
port=8081
username=
password=
web_root=
ssl=0
That’s it, now you can start using SickBeard. The first time you add something it’ll ask you where you want to keep it and what quality you want. Hit me up in the comments if you have any questions.